
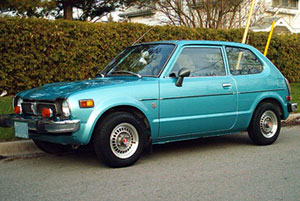


Thor 1StGen Civic Coming home!
-
Thor

- LSD

- Posts: 3624
- Joined: November 30th, 2005, 8:05 am

- Province/State: Stratford upon Avon
- Model: —————-
Thor 1StGen Civic Coming home!
Note the early-type hinge mods, makes servicing so easy :wink:
Shell is superb, suspension bent on left-hand side, albeit repairable with upgrades :twisted:
More to come
Shell is superb, suspension bent on left-hand side, albeit repairable with upgrades :twisted:
More to come
- Attachments
-
-
-
-
-
-
-
-
-
- image.png (182.48 KiB) Viewed 1887 times
-
Thor
- LSD
- Posts: 3624
- Joined: November 30th, 2005, 8:05 am
- Province/State: Stratford upon Avon
- Model: —————-
That's why we call it Spectrum 
I'm waiting for comments from 2 previous owners, Gene and The
Gremlin whom it bit downhill into a wet island. That's when the bent suspension was diagnosed. It bit both of them before I got a good look at it.
It's a standard 1335 EN4 at present, but I have a spare ''S''head casting that burns less oil than the guides in the one fitted. Good excuse, eh?
Correct pedals and shift linkage are also fitted, so it'll be a track car, possibly a rally car.
6'' alloys will be polished up on my rim lathe [axle stand, 3rd gear and a wire brush] after 10 years worth of brake dust has been removed.
Better find some seats, maybe a pair out of a Hyundai Coupe S2 evolution that I am preparing for use :twisted: although I think that they would go better in ADA which will be my daily beater.
I'll post the work as I do it.
It will all have to be done on a zero budget, so don't expect Justin's quality at the end.
Last edited by Thor on June 14th, 2011, 7:13 pm, edited 1 time in total.
-
Gene
- PanaSport

- Posts: 239
- Joined: April 20th, 2006, 6:34 pm
- Province/State: midlands uk
well, (took a while for the pics to load, damned dongle lol), it's good to see the old girl again, i have to say the black hood does work with the yellow front and the grill change is better and did you change the rear bumper? is the engine the same one that was in when you brought her? ( oops calling the Civ 'her' lol ) definitely needs a clean, lol my current 2ndGen was only a bitty cleaner lol
i'm positive you'll make her Great.
it really is good to know your new project is Spectrum, there i said it lol
let me find an older pic???
ahhh here
I can't wait for some update pics, 
i'm not asking for any though you only just posted lol
nice one i really enjoyed seeing Spectrum again, thanks, Dean 8) 8) 8) 8) 8) 8) 8) 8) 8) 8) 8) 8) 8)
8) 8) 8) 8) 8) 8) 8) 8) 8) 8) 8) 8) 8) 8) 8) 8) 8) 8)
i'm positive you'll make her Great.
it really is good to know your new project is Spectrum, there i said it lol
let me find an older pic???
ahhh here
i'm not asking for any though you only just posted lol
nice one i really enjoyed seeing Spectrum again, thanks, Dean 8) 8) 8) 8) 8) 8) 8) 8) 8) 8) 8) 8) 8)
8) 8) 8) 8) 8) 8) 8) 8) 8) 8) 8) 8) 8) 8) 8) 8) 8) 8)
It's Just A Civic Duty
-
Thor
- LSD
- Posts: 3624
- Joined: November 30th, 2005, 8:05 am
- Province/State: Stratford upon Avon
- Model: —————-
Hi Dean
I thought that it would make you smile.
Nice shot of DGH, I miss that car. At least it drove away from the Nissan Pulsar that hit it. Civic was scrapped as beyond Economic Repair by insurance, sadly.
But at least it killed the Pulsar Turbo. He was not insured, pulled out of a side road, wedged himself into a non-existent gap and stood on the brakes, then tried to claim off my insurance. I did not have any of it and counter-sued. I WON, but lost the car.
C'est la vie :roll:
-
Gene
- PanaSport
- Posts: 239
- Joined: April 20th, 2006, 6:34 pm
- Province/State: midlands uk
yes Thanks again for that, yup i have totally fond memories for DGH she was my first Honda but i have a replica as my newest so i get a kind of nostalga driving GELY but i have to change the engine and box, the only reason that i sold DGH was because i had two 2ndGens and FOX was the better condition, and i desperatley wanted to get some more go in one, so i brought an S lol i'd better retort, so DGH is with me every day now, i'm happy with that and the fact you killed the Pulsar Turbo, but even more so because you drove away after, that was my experience with FOX too, i drove 7 miles to work and then 15 back then 24 for the insurance inspection, and then about 17 to the scrap yard, the radiator was Smushed but wasn't leaking or overheating, wow
"I Stand by these Old Hondas you know" but i prefer Driving them LOL
P.S. do you remember when i sold you Spectrum the Rear Engine Steady Bush was as soft as Excrement. that may be why i only put my foot down in Spectrum on the straits and not round the bends, cheers and happy RestoModding, Dean 8) 8) 8) 8) 8) 8) 8) 8) 8) 8) 8) 8)
It's Just A Civic Duty
-
Thor
- LSD
- Posts: 3624
- Joined: November 30th, 2005, 8:05 am
- Province/State: Stratford upon Avon
- Model: —————-
Thor 1StGen Civic Coming home!
Wouldn't it bounce more on the open road, as they then to rise up from the fenders.Did you just cut open the end of the hinge to let it slide off the pins.
It's a little bit more involved than that, but all well worth doing as the hood panel works normally, until you wish to remove it, a process that takes seconds, and under a minute putting it back on.
The air outlets make ideal handles when fitting /removing the panel, I use the ones nearest to the front when lifting it away.
I talk about battery side, not left or right as we have the panel upside down which transposes left and right, as does standing in front of the car, looking at the windscreen. I do not advocate doing what I have done, merely placing it here as what I have done for your interest
1 - Cut washer pipe near hinge and remove the panel and place upside down on a workbench.
2 - Remove front trim - be careful most all have been bolted up for more than 40 years. This is to avoid cutting and damaging it when removing the weld in #3.
3 - Cut or grind the weld off flush to its bracket on the hinge pin on the RIGHT-hand side of each hinge as you look at it upside down. Do this with the hinge assembly closed.
4 - Cut the hinged part to clear the hinge pin and then slide it off. Part of the front flange will need to be removed to allow clearance for panel removal.
5 - Prove the fit of the part and fettle the cuts, [edges will be sharp] .
6 - Whilst fettling the hinge pin parts, shorten one hinge pin by 1/3. This means that you can get one pin in first. It makes it a lot easier, if in doubt, try it with 2 equal pins,
7 - Drill a small hole through the end of the other hinge pin to take a small ''R'' clip. Fit this hinge to the battery side.
8 - Loosely fit the hinge pin plates to the front rail, and slide the hood [hood]panel onto them, fitting the longest one first. An assistant is handy for this, but I manage on my own.
9 - Open and close the panel, this will align the pins. Then tighten them up. Check the catch is happy to release. Me? I click the panel shut and the tighten the bolts with it closed after having checked panel clearances.
10 - Open the panel and carefully slide it off, if all the clearances are correct, it should slide off towards the battery.
11 - Fit an 'R' clip to secure if you wish, but I never have as the hinge assembly when closed is trapped in position by the folded part of the hinge, they effectively form a male/female relationship.
12 - Note that it will work with the hinge cut either side, BUT the panel has a natural desire to slide off to the opposite side from the battery especially when using the stay with oiled hinges [it's the angle of the strut turning the support pressure into a side thrust, so cutting it as I suggest means that it works normally without fear of it rocking off in the wind [my first one did as I cut it opposite to what I have suggested]. I guess the ''R'' clip would have stopped this, but mistakes do get made when making progress!
