 |
 |
|
 |
|
|
|
Vulcan's Grot Watch |
|
|
Welcome to Vulcan’s Body shop!
Vulcan (vul-kan): That lad what made bits of stuff fer t’Roman
gods; a large, extinct delta-winged bomber; them sorts what have sex
every seven years.
Got rust? Just hover your pointer over the piece of
bodywork
you’re interested in and click to get to that page. I’ve
tried to provide ‘before’ and ‘after’ pictures but sometimes
when I get the urge to work, I just don’t get time! BTW, this bit only
includes how to spot the grot, for fixing it just follow the links. I
intended these pages to be a useful bit if you’re looking to acquire
one of these cars, or just want a guide to where the metal moth is
likely to attack. Don’t want you getting stung do we?
Also, click on "What the frig?!"
for details of rust & that you won’t see until you’re stripping
the car down or you find it accidentally. Like just when you think you’re
finished with that bit……...
Aye-up Toto! We’re ain’t in bloody Kansas any more! For all you
newbies to bodywork or cars in general then this
bit’s for you. Here I’ve put in details of tools,
techniques and some rules of thumb to help you on your way.
For those of you with a little more experience I’ve also included
notes on how to do what I did so hopefully you’ll get better results.
Please note that none of this info is necessarily the best way of doing
something. I’ve provided info on what I’ve done and has worked, so
feel free to ‘do your own thing’ (I know I did!)
Anyway, without further ado, here’s the bit you’ve
been waiting for.
|
|
|

|

|
|
Doors
|
Rear
Valance
|
Rear
Hatch
|
|

|

|
|
Rear
Wheel Arches
|
A-Posts
& Scuttle
|
Bumper
Blades
|
|

|

|
|
Sills
|
Hood
|
Front
Valance
|
|
|
|
|
|
Boot
Floor
|
|
|
Wings
|
Boot Floor
|
|
|
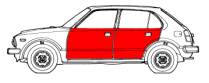
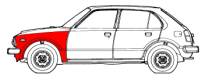
Wings
Okay, here’s how to tell if you need a new wing or not. This is also
quite helpful if you’re buying one of these. These symptoms can be used
as leverage if you’re trying to bring the price down. First I’ll tell
you what to look for with the wing on and then what to look for if you
have it off. (And don’t say Dannii Minogue!!!!!)
Rust on the outer wings is easy to spot. Starting from the front look
for signs of paint bubbling or flaking around the lower two bolts holding
the wing to the front valance. Feel the texture of the metal. It’s quite
thin around this point and any ‘give’ in the metal will mean advanced
corrosion. Expect the valance to be corroded as well.
Next examine the indicators. These are held on by self-tapping screws
secured through small metal clips that slip onto the panel. Corrosion
directly at the ends of the indicator is usually due to these clips
chafing the paint away. Unless you’re very unlucky only the surface of
the panel should be affected.
|
|
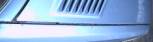
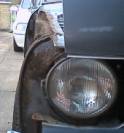
Corrosion forming between the top of the indicator and the
hood is more serious. This is probably due to perforation of the
panel from underneath. The front bulkhead butts against the wing
at this point and is separated by a rubber strip. Corrosion here
is usually because the rubber has chafed the wing from underneath,
allowing water in. This usually means that the bulkhead is
buggered as well and should be checked. A quick inspection can be
made by removing the trim surrounding the headlamp. If rust can be
seen on the top left of the bulkhead then expect to make repairs.
In the UK this panel is often bodged. If you can see metal patches
pigeon-shitted on then expect advanced corrosion to be present
when the wing is removed.
  Signs of corrosion along the top of the wing is serious. This
means that the flange bolted under the hood is likely to be as
rotten as a pear and is about ready to part company with the
panel. Feel it. If it crunches then you’ve got trouble. While
you’ve got the hood open any bodgery around the tops of the
inner wings will be easy to spot. If in doubt, remove some of the
wing retaining bolts. They should be 10mm Isometrics fixing into
captive nuts under the inner wing. If they’re self-tappers then
the inner wing’s been stuffed up big time. Expect to break out
the MIG Signs of corrosion along the top of the wing is serious. This
means that the flange bolted under the hood is likely to be as
rotten as a pear and is about ready to part company with the
panel. Feel it. If it crunches then you’ve got trouble. While
you’ve got the hood open any bodgery around the tops of the
inner wings will be easy to spot. If in doubt, remove some of the
wing retaining bolts. They should be 10mm Isometrics fixing into
captive nuts under the inner wing. If they’re self-tappers then
the inner wing’s been stuffed up big time. Expect to break out
the MIG
|
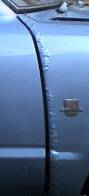  Now
examine the trailing edge of the wing. A vertical line of
corrosion is serious. The wing comprises two main panels, the
smaller of which is secured to the outer panel by a fold of
steel. Corrosion normally means the two are trying to part
company. Expect the small tab at the bottom, bolting the wing to
the sill, to be rusted as well. (If it is then removal of the
wing will probably reveal surface corrosion on the inside of the
panel above it. Now
examine the trailing edge of the wing. A vertical line of
corrosion is serious. The wing comprises two main panels, the
smaller of which is secured to the outer panel by a fold of
steel. Corrosion normally means the two are trying to part
company. Expect the small tab at the bottom, bolting the wing to
the sill, to be rusted as well. (If it is then removal of the
wing will probably reveal surface corrosion on the inside of the
panel above it.
|
 Okay, now let’s have the wing
off. There are eight bolts in total. Four along the top under
the hood, two on the front valance, one at the base of the
A-post and one behind the headlamp trim. Okay, now let’s have the wing
off. There are eight bolts in total. Four along the top under
the hood, two on the front valance, one at the base of the
A-post and one behind the headlamp trim.
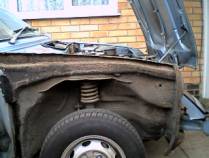
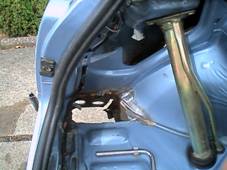
You’ll be faced with something like this. Don’t be
surprised if you see a shorter version. Some didn’t extend
past the suspension turret I believe.
|
|
 This is what it should look like underneath all of that filth.
 A missing piece of bodywork is an obvious indication that
the body has been seriously butchered but we’ll take this from
the top. N.B. If you have shortened chassis rails they will be
tapered in against the inner wing. There should be no open ends. A missing piece of bodywork is an obvious indication that
the body has been seriously butchered but we’ll take this from
the top. N.B. If you have shortened chassis rails they will be
tapered in against the inner wing. There should be no open ends.
.
 A
missing piece of bodywork is an obvious indication that the body
has been seriously butchered but we’ll take this from the top.
N.B. If you have shortened chassis rails they will be tapered in
against the inner wing. There should be no open
ends. A
missing piece of bodywork is an obvious indication that the body
has been seriously butchered but we’ll take this from the top.
N.B. If you have shortened chassis rails they will be tapered in
against the inner wing. There should be no open
ends.
|
|
  If
you already know from the above instructions that the top of the
inner wing has been bodged start the examination at the back,
from where the upper chassis rail is welded against the A-post.
Any corrosion of the top of the inner wing or the scuttle in
front of the windshield in this area is indicative of serious
problems. The flange on the top of the inner wing, the wing
itself and the chassis rail form a 3-sided box section that
traps mud and moisture kicked up by the wheels. If this has
collected sufficiently to rot the flange than the chassis rail
will almost certainly have been perforated. Look for surface
corrosion first. However, if the car has received the
ministrations of a cheap body-shop it may be covered by lashings
of cheap under seal. The best way to check is to squeeze it. Any
give along the top of the chassis rail means it’s scrap. If
you already know from the above instructions that the top of the
inner wing has been bodged start the examination at the back,
from where the upper chassis rail is welded against the A-post.
Any corrosion of the top of the inner wing or the scuttle in
front of the windshield in this area is indicative of serious
problems. The flange on the top of the inner wing, the wing
itself and the chassis rail form a 3-sided box section that
traps mud and moisture kicked up by the wheels. If this has
collected sufficiently to rot the flange than the chassis rail
will almost certainly have been perforated. Look for surface
corrosion first. However, if the car has received the
ministrations of a cheap body-shop it may be covered by lashings
of cheap under seal. The best way to check is to squeeze it. Any
give along the top of the chassis rail means it’s scrap.
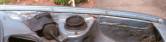
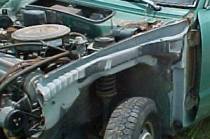
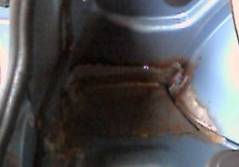
If the section between it and the scuttle appears solid
though, thoroughly clean the area with wire wheels
and a
3M Scotch
Brite disk. This one had been prettied up with body filler, bits
of scrap Dexion and the obligatory cheap under seal. If this
section of the chassis rail is as bad as this then I don’t
reckon it’s safe to leave any of it on the car. Take the whole
lot off and start with a clean slate. I used an angle grinder
and
a cold chisel to take the top layer of metal off the spot welds.
|
|
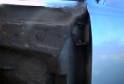
 Moving
down, check the metal by the suspension turret. If you’ve
already taken the chassis rail off then this bit’s easier to do.
There’s a line of spot welds where the suspension top plate is
welded to the inner wing. Any bodgery of the flange above the
turret is cause for immediate concern and my advice would be if
yours has been buggered about with then you should consider, if
you haven’t already, removing all or part of the chassis rail. Moving
down, check the metal by the suspension turret. If you’ve
already taken the chassis rail off then this bit’s easier to do.
There’s a line of spot welds where the suspension top plate is
welded to the inner wing. Any bodgery of the flange above the
turret is cause for immediate concern and my advice would be if
yours has been buggered about with then you should consider, if
you haven’t already, removing all or part of the chassis rail.
You can’t inspect the welds with it
in-situ. If these welds
are compromised then it would seriously weaken the top plate, in
fact rust may already be beginning it’s journey up and over it.
I got to mine just in time. There was about 4mm of steel left
before the welds.
 Now
let’s look at the front bulkhead. If, as described above, you’ve
already taken the headlamp trim off and seen what looks to be a
spray-painted Ryvita attached to your car then your bulkhead needs
work, and the front of the chassis rail will probably be shot too.
Again, look carefully for signs of well-concealed bodgery. Check
the front scuttle as well. Now
let’s look at the front bulkhead. If, as described above, you’ve
already taken the headlamp trim off and seen what looks to be a
spray-painted Ryvita attached to your car then your bulkhead needs
work, and the front of the chassis rail will probably be shot too.
Again, look carefully for signs of well-concealed bodgery. Check
the front scuttle as well.
|
|
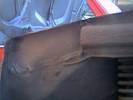
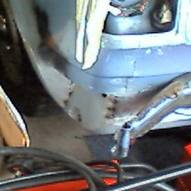
Just one
more thought I want to leave you with. Don’t assume that because
it feels solid then it’s okay. This bit looked fine on
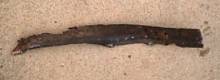 the outside. In fact, it was almost a shame to remove it but
because I was already pulling
the outside. In fact, it was almost a shame to remove it but
because I was already pulling
 off the chassis rail, it had to go. I ripped it off and took a
look at its obverse side. Rotten as a pear. The lower half was the
only bit that was original, the top was made of scrap angled steel
held on with tacks. This was bodgery at its worst and the under
seal and filth did a good job of hiding it. You can’t be too
careful.
off the chassis rail, it had to go. I ripped it off and took a
look at its obverse side. Rotten as a pear. The lower half was the
only bit that was original, the top was made of scrap angled steel
held on with tacks. This was bodgery at its worst and the under
seal and filth did a good job of hiding it. You can’t be too
careful.
Okay, you’ve
read the above after you’ve bought the car and found the inner
and outer wings, front valance and the upper chassis rail are
shot. Firstly, swear. There’s a lot of metalwork that needs to
be done. Secondly, check out the ‘Tools
of the Trade’, I’ve made some recommendations of what you’ll
need to buy. Thirdly, have a look at this next bit.
|
|
HELP
ME NUH!!!!!!!
|
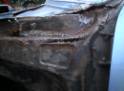
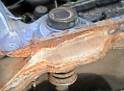
Boot Floor
What the frig?! Verily. That’s putting it mildly when I discovered this little batch of loveliness in the boot floor! My real language near turned the air blue so I doubt
anyone would much appreciate me putting it on the site! The meaning’s the same though. You think that bit’s looking all pukka then you have a bit of a
ferret about for no good reason, just a strange sense of unease, the sort you might get after eating too much chocolate. (Assuming it’s possible to do such a thing!)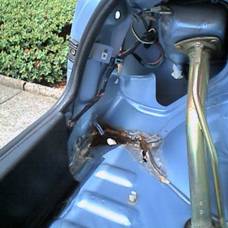
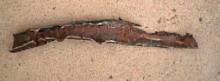
Okay, this is what you might be confronted with: ‘Orrible ain’t it? I saw a little ‘surface’ corrosion on the boot floor on the underside. Looked in the boot and it looked fine. Then I
realized that there was a bunch more metal hiding behind the trim panel. Took that out and initially it didn’t look too bad. There was a lot of sealer round the joins which hid most of it. The wire wheel though didn’t just remove the sealer it also knocked out a great lump of boot floor. A bit more poking with a screwdriver revealed even more fresh air. You can’t be too careful.
After I’d used the nibbler and senior hacksaw blade to cut out the rot this was what was left. Not nice.
|
|
This is how it looked when I’d finished, namely, what it’s supposed to be looking something like.
As you can see, it’s just tacked in place for the moment but it’ll be seam welded later. This is the kind of repair that’ll make you a bit depressed. After taking the trouble to make the indented section for the grommet and making a panel to butt-weld into the boot floor you’ve got to come to terms with the fact that your handiwork will never again see the light of day. At least you’ll know it’s there though instead of a fistful of rust, which is the main thing.
|
|
Tools of The Trade
|
|
Okay,
hints and tips time for newbie’s and the confused. First off,
don’t worry! We all have to start somewhere. I started my
restoration when the fog light lens fell off the car. I’d had
it in storage for a few years wondering where to begin and then
one day, plop. It kind of snowballed from there!
First
rule is:
Don’t
take it apart unless you know how it goes back together! How
many times have we seen or heard of this? Someone taken on a
project, often quite reasonable, and then gets rid of it because
they have made a pig’s ear of it? (Or run out of money!) If
you’re new to the game then what I’d suggest is that you
invest in a digital camera. It doesn’t have to be fancy, just
good enough to take clear pictures when needed. Don’t launch
yourself into a total strip down if this is your first time out.
Firstly, you might lose valuable parts & re-assembly info,
and secondly you could end up sitting in a garage surrounded by
boxes of dirty parts, crying into your tea and muttering “Oh
god, oh god…..” at the thought of the monumental task ahead.
Remember: Baby steps!
Second
rule is:
Buy
good tools! Don’t
go down to your local Pound land and buy the biggest
presentation-boxed-socket-set you can find. You will get a load
of bits you’ll probably never need and no room in the case for
extra ones you do. Not to mention the overall quality of the
tools might not stand the test of time and frustrated humans!
Get what you need when you need it and go for quality, the best
you can afford. I quite fancy Metrinch sockets and spanners, but
to save money I’ll go for cheaper unbranded ratchets and tommy
bars. These are quite good because they’ll still work even if
the head of a nut or bolt has rounded off a bit after having at
it with a cheaper socket! Cheaper sockets do have their place
but I’ll say more on the link above.
Third
rule is:
Take
your time! We’ll all hit ‘The Wall’ from time to time, so
if things aren’t going to well, just put your tools down and
come back to it later. Sometimes you’re ‘in the zone’ and
other days you aren’t. By the same token though if things are
going too well, just ask yourself “am I doing this right?”
I’ve had that a few times. You think you’ve just make a
cracking pair of wheel arches (or whatever) and then you realize
you’ve made them for the same side. Yes, dumb mistake I know
but not very serious though. When it comes to cutting rotten
metal out of your car though, things can get very serious, if
not unsafe. I have heard stories about people launching
themselves into a restoration, cutting the sills out of their
newly acquired Consul Capri and welding in new ones, only to
discover that the doors no longer fit. By cutting out both
sills, they had allowed the car to flex. Remember what I said
about unfinished projects? Yep, it does happen.
Fourth
(and final) rule is:
Be
inventive! With
these cars there’s bugger all available so you’ll have to be
a bit clever when it comes to replacing the irreplaceable! It
can be done though. Click on this link and you’ll find all of
the little dodges that I’ve used. I would suggest that you
check out the other stuff above before going here, that way at
least you’ll know what I’m going on about.
Right,
that is your initial grounding in the ways of Civic restoration.
This is what I have learnt through practical hands-on
experience. I’m not trained in anything so what I’m telling
you is what I’ve taught myself, therefore there shouldn’t be
anything here you won’t find a use for, especially if this is
your first time out. Enjoy!
|
|
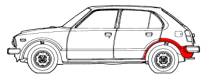
Wheel
Arches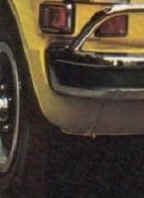
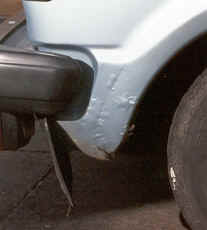
Okay. Let’s begin at the beginning, which in this case is at the ass-end. Have a shufty at the ends of the valance, where the
wheel arch folds over it. You should see something like this. Nice and even. There’s no
mud flaps on this motor so you can see the steel nice and clear.

If you’ve got mud flaps then look for ones that don’t fit well. That’s usually a sign that the steel behind has been patched up with dexion plates and wag. Here’s a picture of my motor, it’s not finished but that’s what you’re looking for. A straight, snug-fitting flap. If yours looks a bit peculiar then the chances are it was either fitted by a visually-challenged
dysphasic chimp, or more likely there’s some bodgery under it.
 Be on the look out for this too. Splits in the bodywork are a sure sign you’ve got rot and filler. Plain, unmolested steel shouldn’t split like that in the middle of a panel. Blistering paint means the panel’s rusting from the underside. I really wish I’d got more
picturess of this panel when I was stripping it down. This was a prime example of how not to ‘fix’ a car. Be on the look out for this too. Splits in the bodywork are a sure sign you’ve got rot and filler. Plain, unmolested steel shouldn’t split like that in the middle of a panel. Blistering paint means the panel’s rusting from the underside. I really wish I’d got more
picturess of this panel when I was stripping it down. This was a prime example of how not to ‘fix’ a car.
 As it happens this bit of twattery was proudly provided by V&J Autospray in Kenilorth. It was run by this aged retard who drove round in a Mk1 Cortina, who had the temerity to proclaim once, in my presence no less!!!!!!!! That: “When a car gets to a certain age there’s not a lot you can do with it.” Hmm........ I wonder if he had the intellect to actually spell hypocrisy. As it goes he retired and gave the business to his shit-stain daughter. She once spent half an hour trying to convince my mother that she: “Could get two and a half grand for it in that condition, in that condition it’s worth two and a half grand, and if you were to sell it you’d get two and a half grand for it. In that condition, two and a half grand would be the price for it if you were to sell it for two and a half grand....... etc......” As it happens this bit of twattery was proudly provided by V&J Autospray in Kenilorth. It was run by this aged retard who drove round in a Mk1 Cortina, who had the temerity to proclaim once, in my presence no less!!!!!!!! That: “When a car gets to a certain age there’s not a lot you can do with it.” Hmm........ I wonder if he had the intellect to actually spell hypocrisy. As it goes he retired and gave the business to his shit-stain daughter. She once spent half an hour trying to convince my mother that she: “Could get two and a half grand for it in that condition, in that condition it’s worth two and a half grand, and if you were to sell it you’d get two and a half grand for it. In that condition, two and a half grand would be the price for it if you were to sell it for two and a half grand....... etc......”
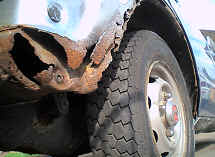
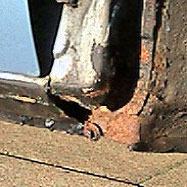
But I digress. Underneath all of that cheap paint and pudding was this. Fresh air anyone? Not good, not good at all. My advice here would be grab the back of the
wheel arch and give it a good squeeze. Any give or crunching sounds and I’d say steer well clear, or use it as leverage to bring the price down to a realistic level, say about £2.50! Don’t forget – you can’t get the repair panels for these cars, not at all so don’t get yourself lumbered with a real basket case unless you’re sure you can fix it. Bondo and chicken wire just ain’t good enough people! With that in mind you should be able to spot a basket case real easy as your typical grease-monkey from Verruca & Jerkoff Autospray wouldn’t be able to follow a compound curve to save his miserable life.
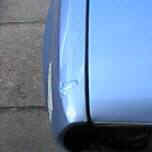
Now then, now then, as Jimmy Saville used to say. Let’s press on. The next way you can tell if you’re looking at a lemon is only really applicable to 4 & 5 door cars and Wagons. That’s to open the door and take a good long look at the door shuts. Compare these
pictures.
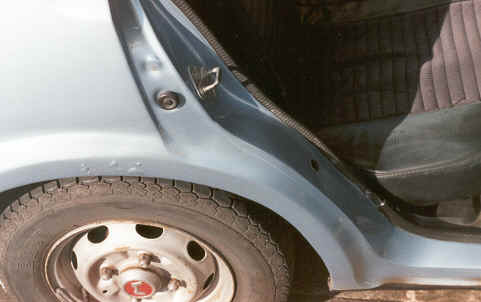
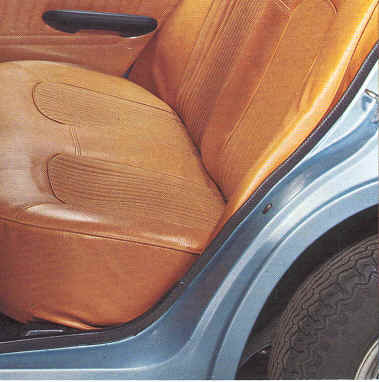 Spot the difference? I thought you might. See on the right pic there’s an indentation in the door shut to
accommodate the rubber door seal. On the left is a pic of mine. As you can see V & J Twatspray have filled it full of pudding. If you look real close you can see a faint line in the paintwork, caused by the door rubber chafing it’s way through the crap. Result? The door don’t fit. You’d have to slam it right hard to make it close. As it goes the rear wheel arches were the only bits of monocoque body that had aftermarket patch bits available. Needless to say they were crap, but they were only ever available for 3-door cars. When this sort of mess is dug out what you’ll find is likely to be a 3-door arch that’s been tacked to the car at the back and the front bit has been hammered (literally) into the recess. Bloody
wankshafts. Spot the difference? I thought you might. See on the right pic there’s an indentation in the door shut to
accommodate the rubber door seal. On the left is a pic of mine. As you can see V & J Twatspray have filled it full of pudding. If you look real close you can see a faint line in the paintwork, caused by the door rubber chafing it’s way through the crap. Result? The door don’t fit. You’d have to slam it right hard to make it close. As it goes the rear wheel arches were the only bits of monocoque body that had aftermarket patch bits available. Needless to say they were crap, but they were only ever available for 3-door cars. When this sort of mess is dug out what you’ll find is likely to be a 3-door arch that’s been tacked to the car at the back and the front bit has been hammered (literally) into the recess. Bloody
wankshafts.
But don’t just take my word for it folks, res ipsa locutor as we say in the law! Bodgery = Fresh air. Simple as that. By the time the recess in the door has disappeared under pudding, you can almost guarantee that the original arch, or any useable bit of it, has been claimed by the metal moth. Again, unless you know how to fix it properly – steer clear.
|
|
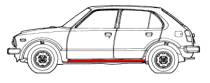
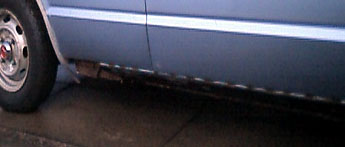
Sills
Okay, let’s assume you’re looking at the car for the first time, what’s going to set the alarm bells ringing? Patches, lumps of MIG and/ or a sticky coat of fresh
under seal apply here, as with any other car but also look for a smooth, curved profile to the sill. If you see this as opposed to gentle swaging along its length then the car you’re looking at has been bodged big time. It’s not easy if you’re unfamiliar with Civics to tell if the sills you’re looking at are shot or not so here’s some
pictures. What you’re looking for is this:
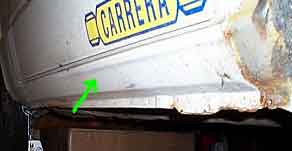 In particular it’s the shadow being highlighted by that fetching green arrow. That’s the underside of a broad swage that runs along the top of the exposed area of the sill. Although it’s only the most delicate of details it is still clearly defined. If it isn’t (or if it’s missing) then the sill had been buggered with. Here it is in profile: In particular it’s the shadow being highlighted by that fetching green arrow. That’s the underside of a broad swage that runs along the top of the exposed area of the sill. Although it’s only the most delicate of details it is still clearly defined. If it isn’t (or if it’s missing) then the sill had been buggered with. Here it is in profile:
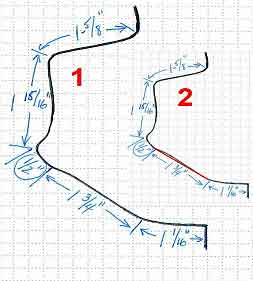 Picture 1 shows you how the profile should be, picture 2 is what you’ll see if someone’s been sodding about with it. Notice the red line on 2. That’s where the outer surface is likely to be after welding/ filling. It’s only a small difference but it’s a real giveaway. If you can’t even see the swage below it easily then you’ve got repeated patching or cover sills but we’ll say more about that later. Picture 1 shows you how the profile should be, picture 2 is what you’ll see if someone’s been sodding about with it. Notice the red line on 2. That’s where the outer surface is likely to be after welding/ filling. It’s only a small difference but it’s a real giveaway. If you can’t even see the swage below it easily then you’ve got repeated patching or cover sills but we’ll say more about that later.
Let’s assume for a moment that the sill has been ‘doctored’. If you’re not a competent tinsmith then walk away. That’ll need digging out and probably at least the lower 1/3 of the sill replacing, more at the back. If the sill looks good then to be absolutely certain it’s as good as it looks then grab the back end of the sill and squeeze real hard. If there’s any sounds of cracking, any give or if your fingers go through then be prepared for trouble.
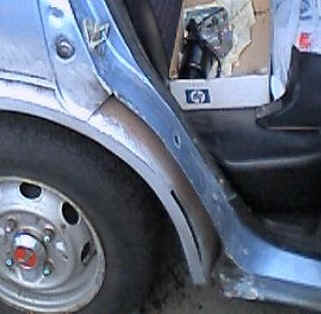
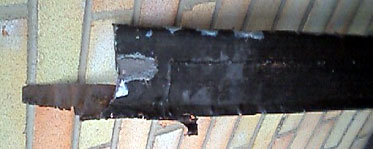
 As a matter of interest, if the sills are smegged then if you can remove the front wings this is what you’ll probably see: As a matter of interest, if the sills are smegged then if you can remove the front wings this is what you’ll probably see:
Lurvely!!!! Just compare it to the picture at the top of this chapter. Doesn’t look like the same kind of car does it? Interesting points to note is the complete lack of profile/ character on the sill. It’s just been turned into a
homogenized blobby curve by repeated patching. Remember above I mentioned cover sills? Well, note the area just in front of the bottom corner of that door there. You can just see a panel curving up over the top of the upper sill swage. That’s a cover sill. As it goes this one was nicely ‘smooved in’ along the top with pudding. Done by some some twunt down Red Lane in Coventry years back. He’s ceased trading ages ago so I can’t go down there and beat the shite out of him with my grandfather’s ball-pien hammer. Worse luck..........
Okay, let’s assume from hereon in that your car has a cover sill. Getting it off is the easy part. Cover sills will 99% of the time have been fitted by a blind badger in a furry anorak. Dig out the kitty hair/ chewing gum/ polyfilla along the top of the sill and 10-1 you’ll see vague line of tacks securing the patch to the car. Have at these with an angle grinder and separate it from the car initially with a cold chisel. All you want to do is break the final bonds between it and the precious car. Then it’s a simple as leaning down on it. Really! It’s that easy! The patch should simply fold down out of the way. Fold it up and down a few times and thanks to the phenomenon of metal fatigue it should just break away. An interesting note here would be to say that mine didn’t do this. When I leaned down on it the front 2/3 of the patch simply broke away from the car. The back end was attached only by a thin scrap of a rusty patch which gave way when I stabbed at it with a crow bar........ about a dozen times..............
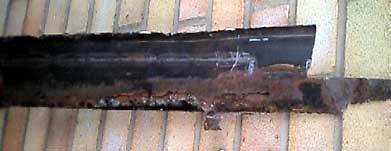
 Here’s a picture of the sill after the cover was removed. I didn’t get one before it was taken off (sorry!) As you can see, there’s a dashed line of dark patches on the paint. That’s where the pigeon-shit (it’s a valid welding expression!) line of tacks had burned the paint. Also you can see that the back of the sill is almost totally eaten away. As it goes I’ve chosen to reconstruct the sill before I tackle the outer skin of the wheelarch. The problem is that so much original datum information has been lost over the years. That’s why I’ve elected to extrapolate/ extend from the original steel that I still have left, hence why I’ve elected to reconstruct the sills before finishing the outer skin of the
wheelarches. Here’s a picture of the sill after the cover was removed. I didn’t get one before it was taken off (sorry!) As you can see, there’s a dashed line of dark patches on the paint. That’s where the pigeon-shit (it’s a valid welding expression!) line of tacks had burned the paint. Also you can see that the back of the sill is almost totally eaten away. As it goes I’ve chosen to reconstruct the sill before I tackle the outer skin of the wheelarch. The problem is that so much original datum information has been lost over the years. That’s why I’ve elected to extrapolate/ extend from the original steel that I still have left, hence why I’ve elected to reconstruct the sills before finishing the outer skin of the
wheelarches.
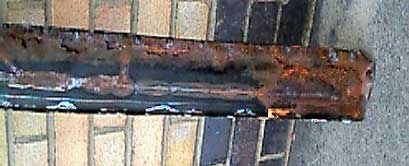
 Here’s the cover sill after removal. Just for the record there’s a large chunk missing from the back of it. It should have extended along the length of the patch that you can see just sticking out to the left there. Here’s the cover sill after removal. Just for the record there’s a large chunk missing from the back of it. It should have extended along the length of the patch that you can see just sticking out to the left there.
You can clearly see also where the cover sill itself has been patched. Badly. The twunts responsible for this are still trading. While on the one hand I’m tempted to go round there with a crate of petrol-filled brown-ale bottles I’m not actually too fussed. It’s only a cheap cover-sill they’ve mullahed after all. As the guy from ‘Christine’ said “You can’t polish a turd”. In any event, it was my mother that was actually fool enough to pay them........
Along the bottom edge of it you can also make out a line of ‘blobs’. They’re not just any old blobs. They’re the remains of plug welds. That’s where the upper panel of two pieces being lapped has holes made in it which are then subsequently MIG welded round inside their circumference. As a matter of interest when this sill was taken off and examined from the rear:
 I actually found that they had been trying to attach that ‘neat’ line of plug-welds to filler. See that line of grey shite along the bottom edge there? Oh yes...... I mean come on, Exactly how much intelligence does it take to be able to tell the difference between filler and steel? Obviously more than can be found in the heads of the smeggers down Spon End. And they get paid for this!!!!!!! I actually found that they had been trying to attach that ‘neat’ line of plug-welds to filler. See that line of grey shite along the bottom edge there? Oh yes...... I mean come on, Exactly how much intelligence does it take to be able to tell the difference between filler and steel? Obviously more than can be found in the heads of the smeggers down Spon End. And they get paid for this!!!!!!!
There’s more plug-welds here. Along the top edge (as viewed from this angle) of the cover sill you can clearly see more of those plug-welds. This time they’re not attached to anything at all. This is the end of the sill that broke off when I folded it down. As it goes the back end would have broken off too had it not been for the patch that had been welded to the inside of the back of the sill. That’s the ‘tail’ you can see in the other image. Also, can you see the white ‘line’ below that? That’s where more patches had been added to the outside. Considering that these patches weren’t actually attached to anything in particular then they were a total waste of time and money. In fact, I haven’t covered these in any particular detail because they came off with the cover sill. What was the point of them? Really, was there one at all? I doubt it, beyond getting the car through the
British MOT. Which isn’t worth the paper it’s printed on. But I digress.
Now bearing in mind that the outer sill skins are actually load bearing member in these cars, unlike the Rover P6, this is quite disturbing. That’s why it is always imperative that you pay close attention to that little ghost-like swage just below the doors. If that’s missing then you know that important pieces of steel have been messed with. Unless you actually take the car apart you’re not going to know if they’ve been fixed properly or not. A little time on your hands and knees before buying could save you a heck load of time later. And more importantly could save you from dying, should you collide with anything tough. Like a pheasant......
To be Continued
Keil.
|
|
|
|
|
|
 |
|
 |
|
|


