If your interior trim’s shot to pieces
you’re not alone. Especially if it’s been removed before and then replaced by
the Incredible Hulk you’ll probably be faced with a lot of splitting
round the screw holes. It can be fixed quite well enough though.
Firstly, here’s an example of a pretty
rough piece.
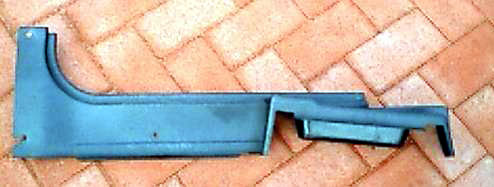
As you can see it’s got it’s fair share of
splits and scars. This one was the driver’s side and you can see where heels
have been dragged down it over the last 30 years. Let’s deal with those splits
first.
Splits will need to be glued and reinforced
from behind with strips of flexible plastic. By doing this you’ll also be
pulling the split back together.
Now then, I wish I’d got a pic of this one
when I started. The split was approx 4mm wide at it’s worst. As you can see now
though, there’s plenty of support from behind now. From the front you can see
how now it’s virtually invisible. Instead of a gaping wound we’re just left
with a faint line. On there reverse though, you can see there’s a lot of
support holding this thing together.

If you can’t get the flexible plastic in
behind the split, as in this case, I usually drip glue into the back of the
split and then push the crack back together. In this case you can see there is almost
no way to get reinforcement into the back of the split to hold it together.
Mind, after a little superglue was dripped in there from behind to hold it together
temporarily, the strip could be dropped in afterwards. Don’t use too much
glue!! Remember, this trim has a grained surface. If you get glue on it
it’ll fill those details right in. Moreover, superglue will leave a nasty white
residue behind on surrounding areas as it dries. Just like on Beverley Hills
Cop when Eddie Murphy puts a pot of it on the back of a tortoise to develop
a fingerprint. The tortoise is optional BTW, we don’t need one in our case. Mind,
if you do use one let us know how you get on. ;)

 This turned out quite well, everything went
back together just as it should. BTW, Don’t be surprised if you see bits
missing, just be careful. Have a look under the carpet, amidst all of the fluff
and dust, the missing bits will probably still be there. It’s these missing or
disjointed pieces though that’ll give you the most trouble. I’ve found that the
screw has then applied uneven pressure and so any stretching has occurred to
differing degrees. As in this piece, if it’s been cracked for a long time,
especially round a screw, you’ll probably find that even when removed it won’t
go back to its original shape. This is a prime example. At least even though
it’s still visible, there’s nothing missing and I guess you’d only notice it if
you were actually looking. As you can see, it took a heck of a lot of fettling
even to get it that good.
This turned out quite well, everything went
back together just as it should. BTW, Don’t be surprised if you see bits
missing, just be careful. Have a look under the carpet, amidst all of the fluff
and dust, the missing bits will probably still be there. It’s these missing or
disjointed pieces though that’ll give you the most trouble. I’ve found that the
screw has then applied uneven pressure and so any stretching has occurred to
differing degrees. As in this piece, if it’s been cracked for a long time,
especially round a screw, you’ll probably find that even when removed it won’t
go back to its original shape. This is a prime example. At least even though
it’s still visible, there’s nothing missing and I guess you’d only notice it if
you were actually looking. As you can see, it took a heck of a lot of fettling
even to get it that good.
Right, you’ve got everything back together.
You’ll have to deal with the scarring now. It’s not the end of the world. Even
when it’s this bad.
Get a sheet of 1200 grit wet & dry and
lightly rub down the grained surface of the plastic with copious amounts of
clean water. You’re not trying to take the scratches out, more like removing
the burring & swarf that’s still clinging on. Go carefully!!! The
grained effect isn’t very deep and you don’t want to rub it off. You won’t be
able to get most of the scratches out but as long as the edges aren’t ragged
you should be fine. On the top of the trim, where it goes over the seam between
the inner & outer sill panels don’t be afraid to be more adventurous with
the grit. That section can cop a lot of damage with heels & that going over
it. It’s a slightly textured finish but I decided to be a little tricky and
took it back to a smooth surface. Not glossy, just a satin sheen. It’s not out
of place and only a spotter would know for sure!
Wish I could have got some pictures of that
process. Sadly, my camera isn’t too good and didn’t take to shots full of
black, hence the blockpaved background for contrast.
Anyhow, when the surface has been rubbed
down you’ll have to find a bottle of trim renovator. I use Carplan’s Black Trim
Wax. It really is the dog’s dangly bits. It’ll colour everything to the same
hue and you’ll get the right sheen on the surface too. It even smells new!
Whatever you do, Don’t be tempted to use silicone based ‘back-to-black’
trim ‘renovators’. Unless you want a blotchy, wet-look dash that is. It leaves
a nasty residue behind that really makes your fingers feel…. dodgy….. It can be
a right pain to get rid of. I’ve tried soaking parts in washing powder before
now. It seemed to help.
That’s about it. Remember:
1)
Use the finest grit wet & dry you can get.
2)
Don’t rub too hard. The grained detail isn’t
very deep.
3)
Splits to be re-inforced from behind
with strips of plastic.
4)
Don’t go overboard with the superglue. It’ll
fill details and leave white residues.
If you have any problems, just PM me.
Vulcan