|
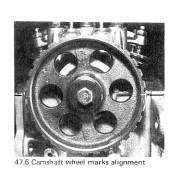 Turn the camshaft wheel so that the two marks on the periphery of the wheel are approximately parallel with the top of the cylinder head, and the woodruff key is pointing upwards (photo). Turn the camshaft wheel so that the two marks on the periphery of the wheel are approximately parallel with the top of the cylinder head, and the woodruff key is pointing upwards (photo).
Tip: Timing marks should be parallel
with the ground not the top of the head. The timing mark on the water
pump side of the cam sprocket will be about 1/2 tooth above the top of
the head.
|
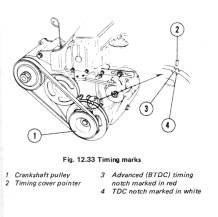 Continue to turn the crankshaft so that the 'top-dead-center' mark on the pulley is aligned with the TDC mark on the timing belt cover. The mark on the pulley closest to the firewall. This can also be determined by observing the valves (all closed) or by feeling for pressure in the spark plug hole (with your thumb or a compression gauge) as the engine is turned. Continue to turn the crankshaft so that the 'top-dead-center' mark on the pulley is aligned with the TDC mark on the timing belt cover. The mark on the pulley closest to the firewall. This can also be determined by observing the valves (all closed) or by feeling for pressure in the spark plug hole (with your thumb or a compression gauge) as the engine is turned.
The pistons in the No. 1 and No. 4 Cylinders should now be in 'top-dead-center'. If the engine is being reassembled on the bench, the key slot in the crankshaft should be at
TDC. (Photo).
|
 It is now time to slip the timing belt over the camshaft wheel and to tension it as described. It is now time to slip the timing belt over the camshaft wheel and to tension it as described.
Remove the crankshaft pulley bolt and turn the crank in an anti-clockwise direction until TDC mark on the flywheel is opposite the crankcase pointer. Now pass a bar or heavy screwdriver through one of the
cut outs in the pulley and hold the pulley still by levering it against the crankcase while the pulley bolt is unscrewed in an anti-clockwise direction.
Remove the rocker cover.
Remove the alternator drive belt.
Remover the timing belt upper cover.
Unbolt and remove the water pump pulley.
Unbolt and remove the flexible sealing plate, which fits between the water pump and the timing belt cover.
From the front face of the timing belt lower cover unscrew the two belt tensioner bolts two or three turns only. Pries out the two rubber sealing rings from behind the bolt heads.
|
Pull off the crankshaft pulley.
Remove the timing belt lower cover by unbolting it and pulling it downwards.
Disconnect the left-hand engine mounting from the engine support bracket and push the outer member as far as possible into the housing on the inner wing.
Extract the dish belt-retaining washer from the front of the crankshaft sprocket, pries the belt tensioner pulley upwards to release its tension and then slide the belt from the crankshaft and camshaft sprockets, passing the belt out through the gap in the engine mounting bracket components.
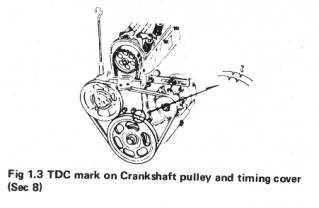
Refitting the timing belt is the reversal of removal but first make sure that the TDC mark on the flywheel has not moved from its position and that the word 'up' on the camshaft sprocket is in its uppermost position.
Make sure that the belt tensioner bolts are left finger tight before installing the belt lower cover and the bolt rubber sealing rings.
Tighten the crankshaft pulley bolt to 65lbf or 9kgf.
When everything has been refitted, tension the belt in the following way. Using the crankshaft bolt, turn the pulley through one quarter of a turn in an anti-clockwise direction. The belt tensioner bolts having been left finger-tight; the belt will now be correctly tensioned by the action of the belt tensioner spring. Now tighten both bolts to a torque of 31lbf or 4.3kgf.
|
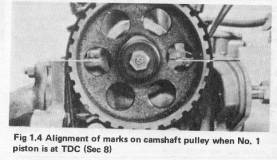 Again once the belt has been installed and tensioned ensure that the camshaft and crankshaft are still in the correct relative positions as described. (Photo) Again once the belt has been installed and tensioned ensure that the camshaft and crankshaft are still in the correct relative positions as described. (Photo)
Tip: Timing marks should be
parallel with the ground not the top of the head. The timing mark on the
water pump side of the cam sprocket will be about 1/2 tooth above the
top of the head.
|
 Distributor - refitting. Distributor - refitting.
With the crankshaft in the No. 1 and No. 4 pistons at TDC, and the camshaft marks horizontal, take the distributor and with the cover off, align the metal tag on the rotor arm with the lug on the periphery of the distributor body. Holding the distributor in this position insert the distributor into the bore housing in the cylinder head. (Photo)
The distributor is driven off a helical gear; so expect to allow the unit to rotate as it is fed into the housing bore to permit the gear on the distributor shaft to completely engage the gear cut in the camshaft.
Complete the static timing adjustment of the distributor using the technique detailed in Chapter 4. The engine will need to be turned to 5º
BTDC.
Source: Haynes service
manual
|
|
Tip: Timing marks
should be parallel with the ground not the top of the head. The
timing mark on the water pump side of the cam sprocket will be about
1/2 tooth above the top of the head. Source:
Tom Wilson
|
|
For Reference Only
|
